The Kite Bar: functions, evolution, components, and its safety
Fundamental for the rider's safety: the origins, the design, how it works, and the emergency systems of the kitesurf control bar.
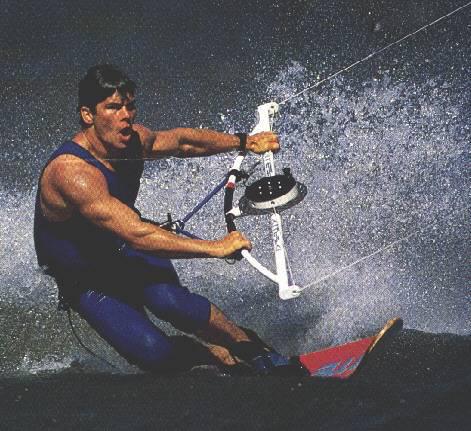
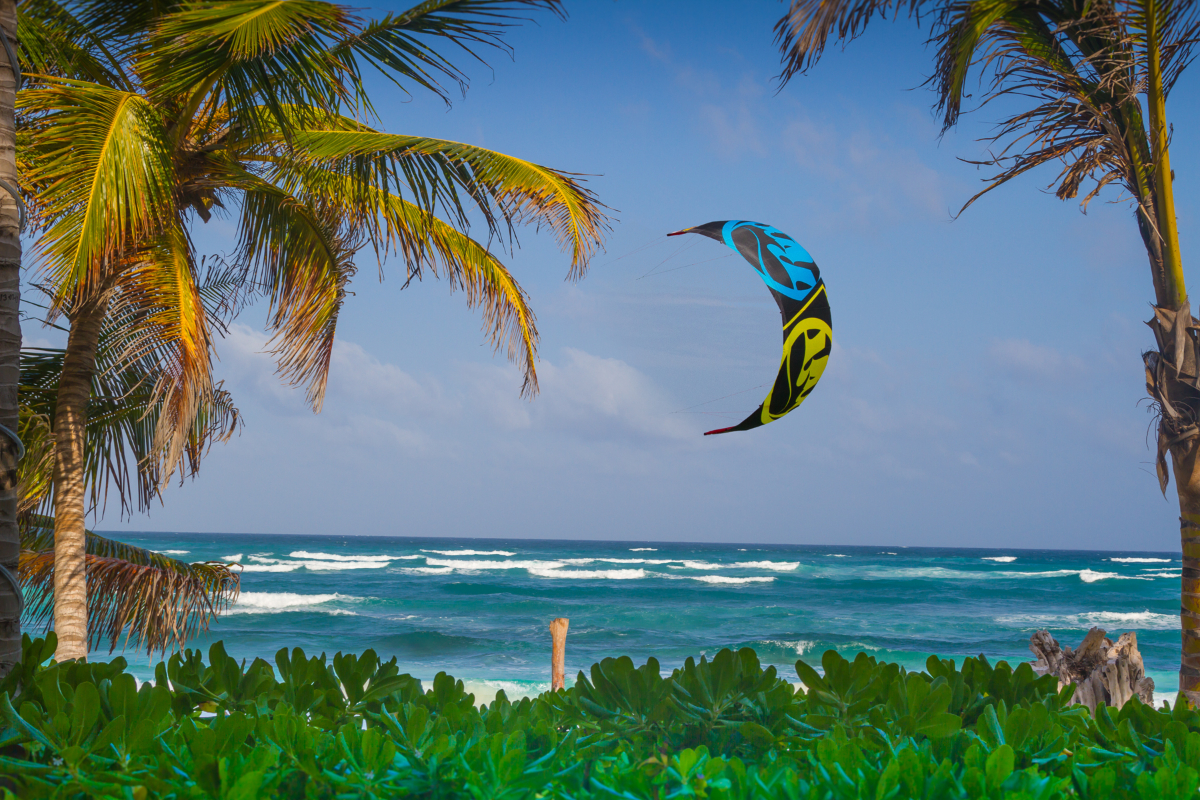
The kitesurf control bar is arguably the most important part of the kiteboarding gear concerning safety and control of the kite’s power. Any kiter obviously knows its functions: in connection with the kite lines, it controls the steering direction of the kite, the level of power it generates, and its transfer to the rider for propulsion.
This post turned out to be quite long. For convenience, the subparagraphs of interest are listed here, for those wishing to skip any part already known to them.
A brief, unprecise summary of the kitesurf bar evolution
The three levels of safety in modern kitesurfing bars in case of emergency
The two added levels of safety
Modern kite bar safety system: the principle on how the kite bar quick-release works
Are kite control bars interchangeable?
A brief unprecise summary of the kitesurf bar evolution
The kite bar design as today we see is the result of many trials and errors in the development and use of this tool. Without trying to be exhaustive, we can list some of the most important steps in its evolution.
From the pioneering experiments of Cory Roasler at the dawn of the sport, the control bar has come a long way passing through several stages. The Artisanal bars were the real start. They had limited or no safety systems, very simple two-line bars with no depower ability nor quick releases of any sort.
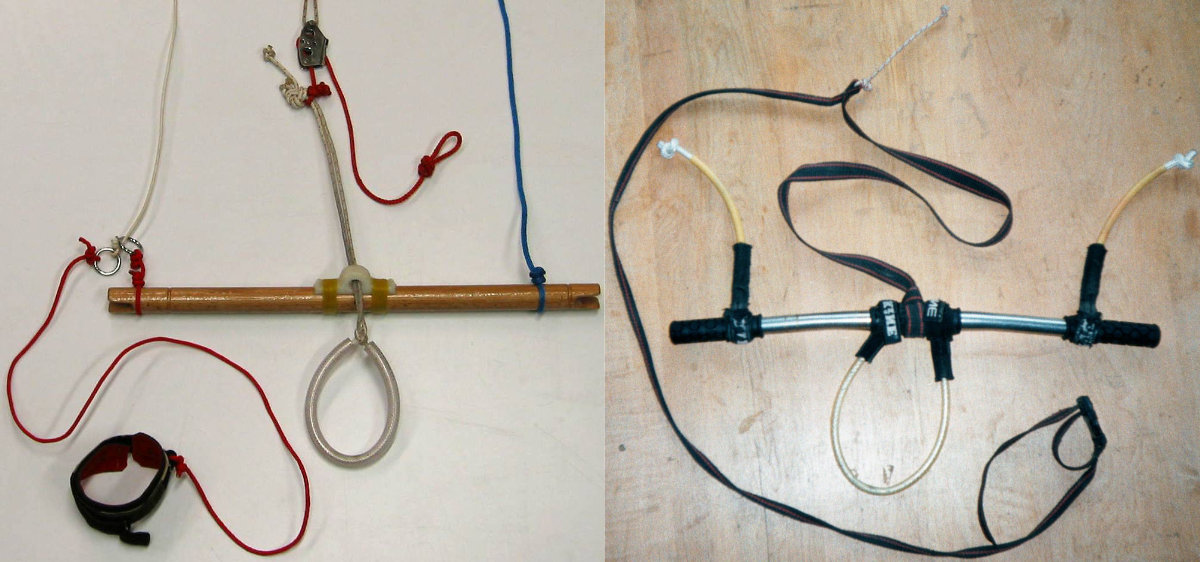
The next step came when it started the upper scale productions with the first manufactured 4 lines bars with fixed chicken loops and no quick releases. In the most fortunate of cases, they featured a sort of emergency re-ride on the backlines attached to straps on the rider’s wrist. If you passed those stages of development, you for sure recall the difficulty in relaunching the first C kites from the water. To have them flip and be able to relaunch the kite, it was needed to swim towards it and often more than once every time.
Fortunately, not long after, an extra line was added to the bar, to ease the relaunch and to be used as an emergency line with the most welcome quick releases.
In that period kite bars had a very short depower central line because, for the first models of C-kites, the capability of depowering was quite limited. Broader depowers came when the new SLE kites started to become popular, together with the need to have a bigger capability in changing the angle of attack of the kite to reach full depower.
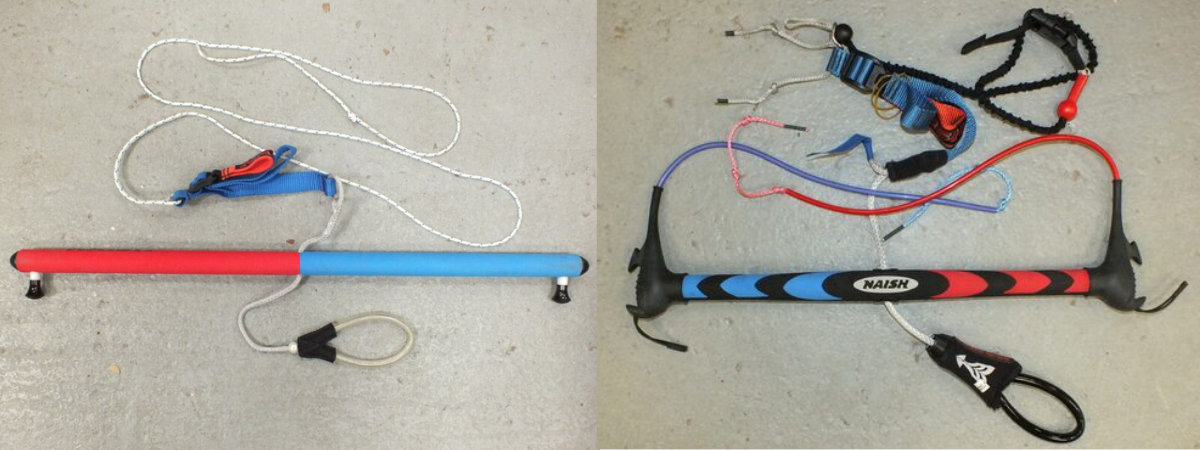
After that, it all came down to the fine-tuning that led to the modern design and its 3 levels of safety systems and all the tech nuances of today’s branded bars. Safe to say that after 2016 most of the best producers on the market provide similar solutions and similar levels of safety. So, if you are looking for a used kite bar for sale, make sure it is not older than that and you will have a good safety system on it.
How the kite bar works
The kite bar fulfills several functions during the kiteboarding session.
It can rotate the kite in the desired direction, by twisting one or the other tip. The tip will act as a ‘break’ slowing the involved wing side, making the kite turn in the desired way.
It can change the angle of attack of the kite, regulating the power generated (About this topic check the cases when the kite can stall due to excessive angle of attack here).
Together with the lines and the eventual bridle system, the kite bar connects the rider to the kite and transfers the forces from the kite to the rider to obtain propulsion.
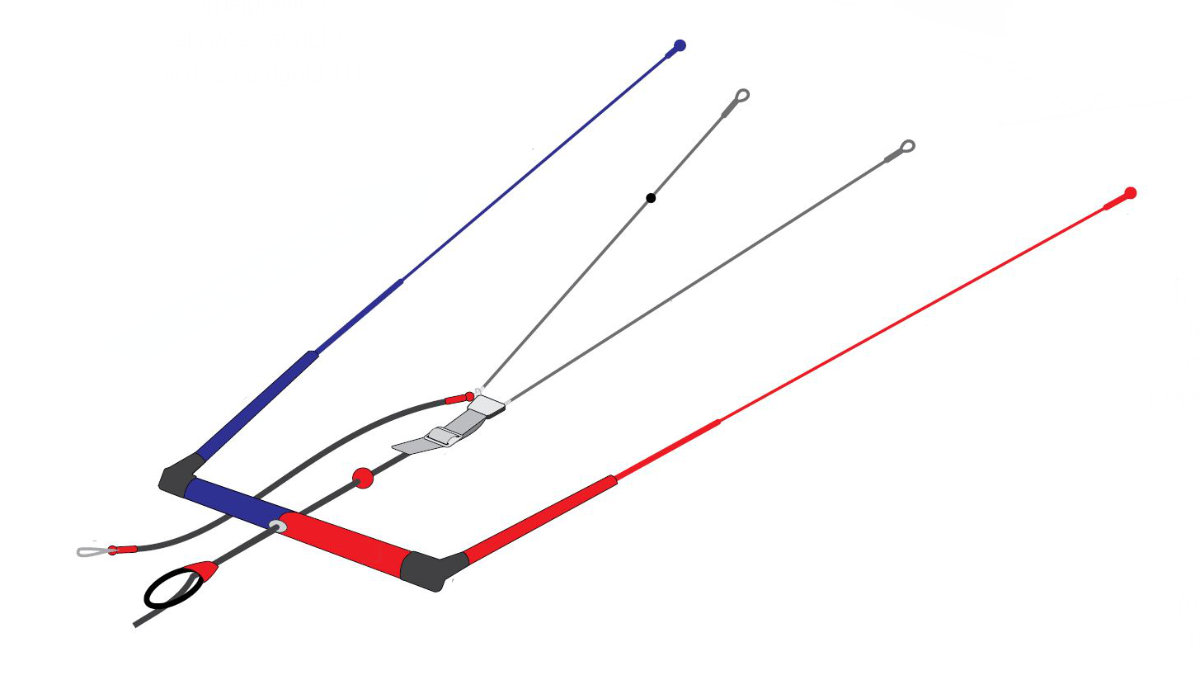
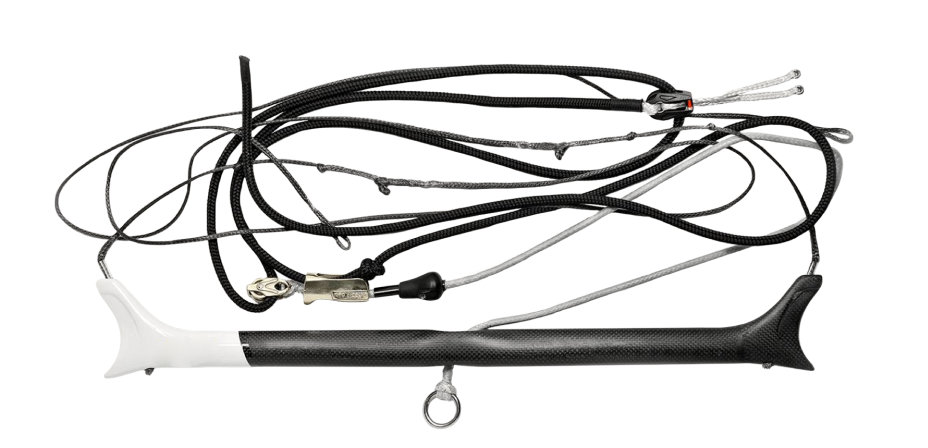
The kite bar parts can be roughly represented as follows, with some slight deviation from brand to brand:
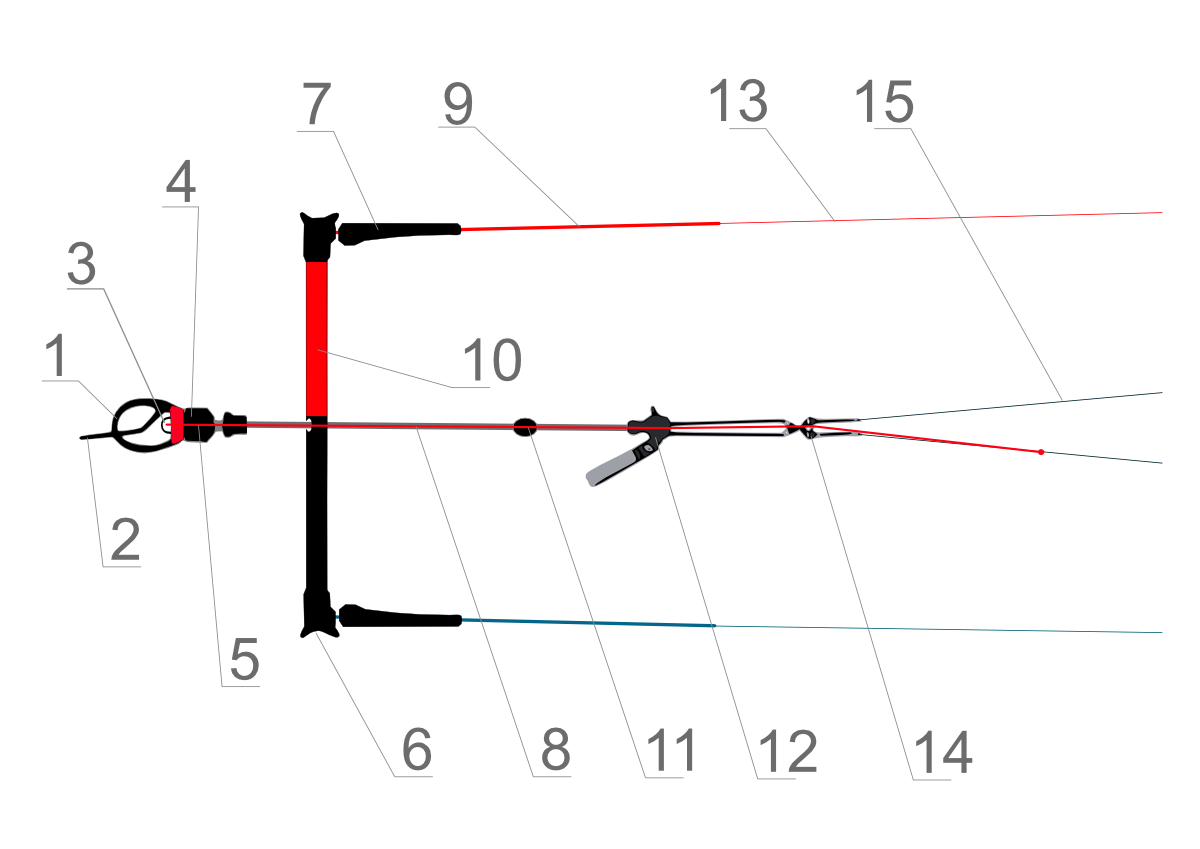
1. Chicken Loop: it connects the harness hook to the depower line and it can be detached or opened to depower the kite in case of emergency.
2. Chicken Loop Finger: it avoids the Chicken Loop to slip out of the harness hook.
3. Emergency line ring connector: it provides the connection for the kite leash to the emergency line.
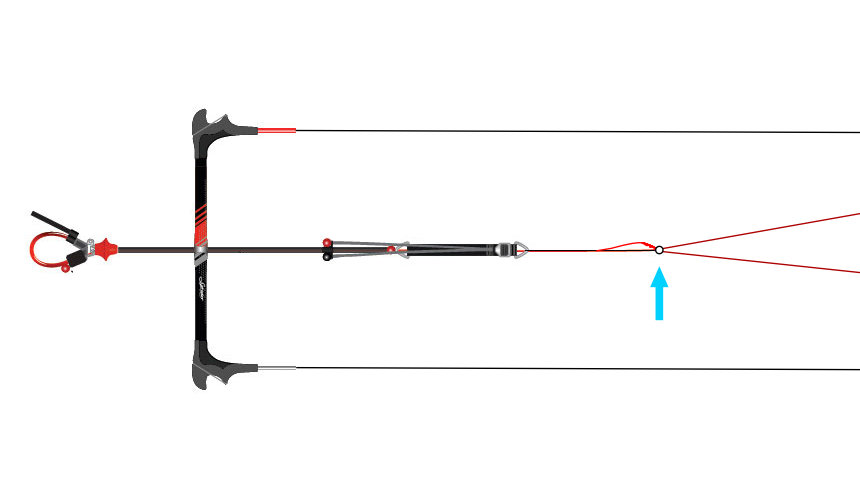
4. Quick Release: the mechanism that can be activated by pushing or pulling it and will instantly cut the power from the kite by opening or dethatching the Chicken Loop from the depower line. It will leave the kiter connected to the emergency line only (the only line holding the tension), while the bar slides towards the kite leaving the rest of the lines loose (you can see that here).
5. Emergency line: it connects the kite leash to a front line (4-line bars) or to the fifth line (5-line bars), to achieve the kite full depower by foiling it.
6. Lines Winding Posts: the end of the steering bar with a shaped concavity to orderly wrap the lines when not in use.
7. Floaters: soft rubber or foam elements that keep the bar floating and protect the rider from directly being in touch with the lines, when in tension.
8. The depower mainline: it connects the rider to the front lines and allows the bar to slide along it. This gives the possibility to change of angle of attack of the kite, by adjusting the ratio between the length of front and back lines.
9. The Pre-line: normally a rubber or plastic pipe that lets the line be taken with better comfort during the kite launch from the water, preventing the kiter from directly touching the line and getting injured by sudden tensions on it.
10. The color-coded Kite Control Bar: it lets the rider steer the kite in the desired direction and power-depower the kite according to its position along the depower mainline. The color code helps to know where the left hand should be positioned, very useful after complex tricks or after losing the grab from the bar.
11. The Stopper Ball: it lets the rider adjust to a minimum power level when the bar is not held in the hands (his element might not be present on all kitesurf bars).
12. The Depower Trim Adjustment: it is used to adjust the power of the kite. Similar to the movement of the kite bar along the depower line, it changes the length ratio between the front and back lines, affecting the kite’s angle of attack on the wind. This device provides a fixed adjustment to match the wind conditions to avoid extreme positions of the bar along the depower line. It helps to minimize or maximize the kite power according to the needs.
13. The Back Lines: they are attached close to the tips of the kite and are responsible for the direction and depower changes.
14. The Y Connector: it connects the front lines to the main depower line. It can vary in its position from very close to the depower trim to very close to the kite, the two cases are referred to as low Y and high Y line setup. This depends on the kite design and shape and it is mostly a choice of the single kite brand.
15. The Front Lines: they normally take a bigger part of the load from the kite and they tend to be the ones more subject to elongation after long periods of use or excessive tensions. The ratio between them and the back lines needs to be checked to assure the correct kite trimming.
The three levels of safety in modern kitesurfing bars in case of emergency
There is a sequence of three actions you can perform in case of danger or control loss. These are:
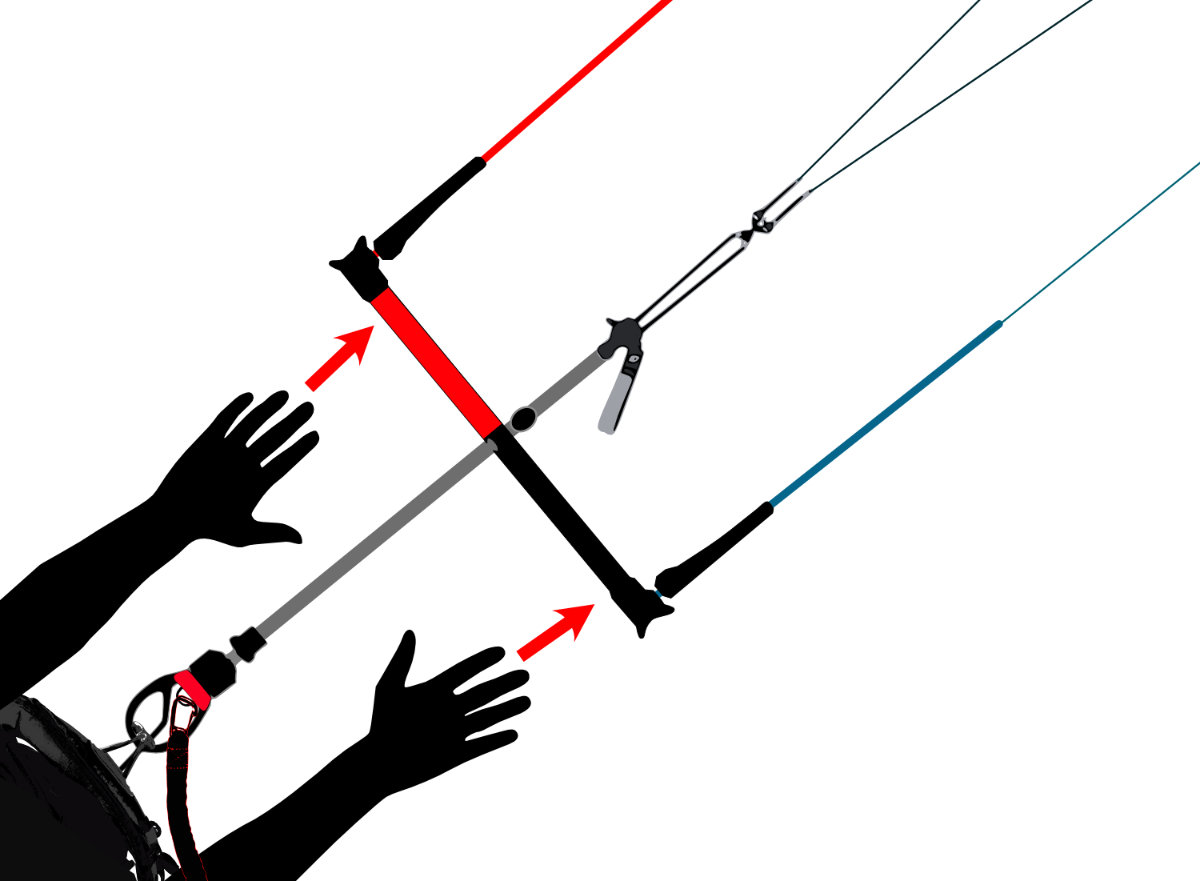
1. Release the bar (let go completely of the bar out of your hands).
2. Activate the quick release on the depower line.
3. Activate the safety release of the kite leash.
Let’s analyze the three moments in detail.
Release the bar
It is the fastest and easiest way to dramatically reduce, if not eliminate, the kite’s pull. It’s quite easy to regain control of the kite after letting go of the bar and grabbing it back in the hands when all is safe.
We should do this any time we start losing control and prevent the worse. It is worth letting go of the bar more often than risking pulling it in uncontrolled ways and getting undesired violent pulls from the kite. This will prevent being dragged involuntarily by the kite and to crash it violently on the water or worse, with the risk of breaking it and hurting ourselves.
When we release the bar, the kite will open and foil delivering a minimum tension. This action will normally resolve most of the tricky situations letting us recover the control and immediately restart our session.
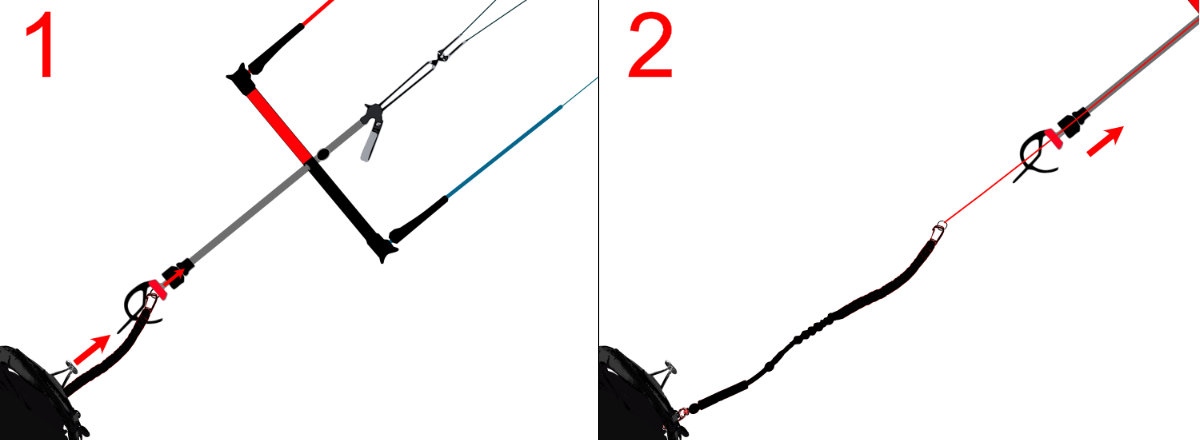
Activate the quick release on the depower line
This is the second step of the safety procedure related to the bars and you should implement it if the first step of letting go of the kite control bar was not enough to regain control of the situation.
The cases when we need to activate the quick release are way less than the times you need to simply let go of the bar, let’s make some examples (of course it is not an exhaustive list):
a. You let the bar go, but the kite is still pulling due to too strong wind and you can’t get back in control.
b. You tangled the kite into another kite, and you need to eliminate any pull to keep everyone safe.
c. You are on the beach, and you are launching in a gusty situation (maybe close to obstacles), and the kite stalls in the power zone with the danger of restarting on the next gust and dragging you on the beach...
When we activate the quick release the bar slides away from us and the kite will remain attached to us just by the emergency line, which normally keeps in tension just one line and completely foils the kite. For a detailed description of this just read the following paragraph.
It is worth mentioning that any kite brand provides its own interpretation of the quick release system and, especially if we are renting a kite or trying a friend’s one, it is very important to make sure we know exactly how that quick release works.
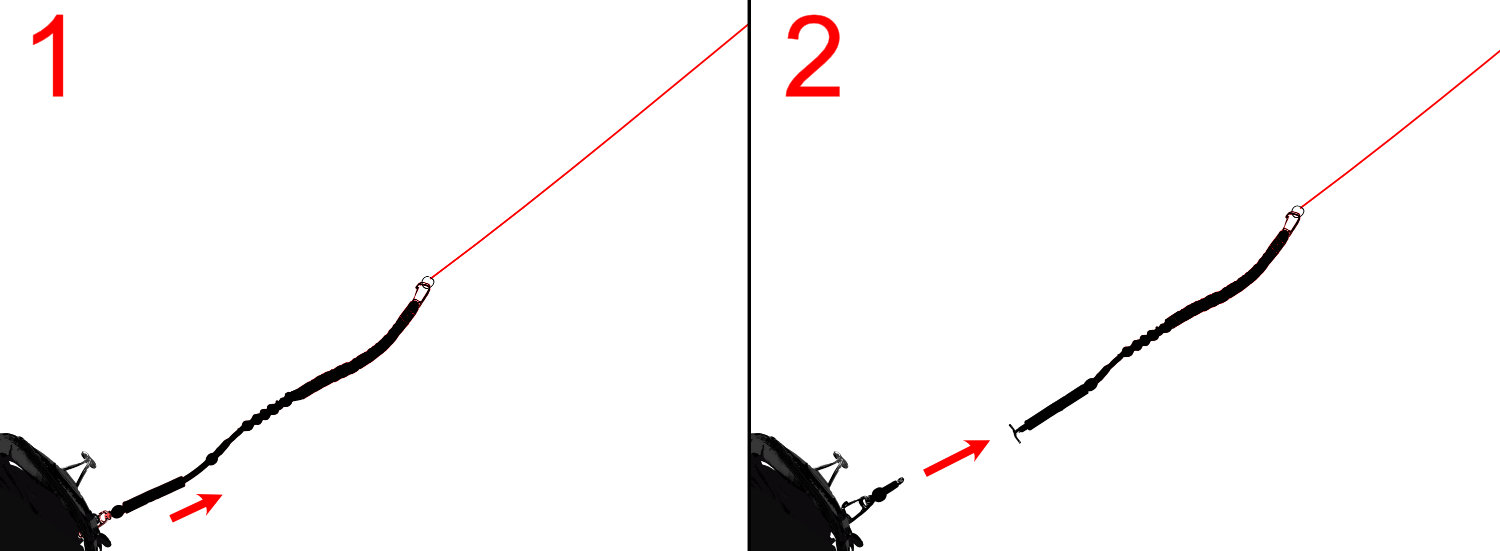
Activate the safety release of the kite leash
If the previous actions are not sufficient, the last resource is to completely sever us from the kite by activating the kite leash release. After you activated the bar quick release in fact, you were still attached to the kite by the emergency line and at this point, if the emergency is not over, you need to let go of completely the kite.
This can result in you losing the kite or having it crashed somewhere on the beach and broken, but even worse the kite uncontrolled could fly against other people putting them in danger, so it is really the last resource we have. Fortunately, it is quite rare when we need to use it, a couple of cases can come to mind could be:
a. You get in an offshore wind situation (maybe due to sudden changes in the weather, by the way, you should read this article on the topic) and you are unable to make it back to the beach. If you don’t separate yourself from the kite, you risk getting too far from the coast and get stranded in the sea.
b. Your kite gets tangled by a motorboat that does not realize they are dragging you and you risk drowning.
We rarely reach these extremes, but better be prepared.
The two added levels of safety
Some instructors and kite school standards nowadays refer to the five levels of safety in kitesurfing, they are not directly related to the kite bar, but it is worth mentioning them.
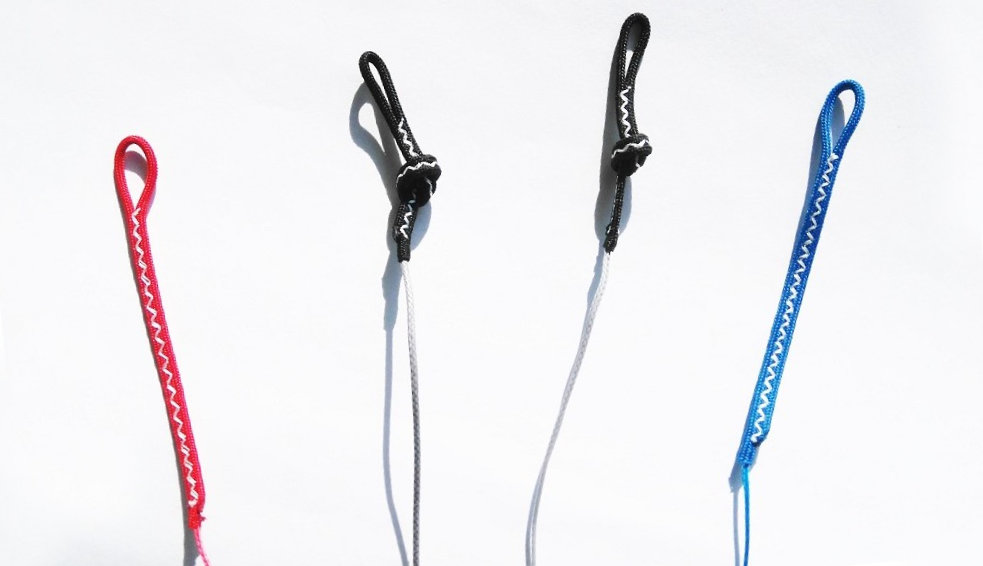
The first is the safety kitesurf hook knife (you can read in detail here). Yes, another option, is to cut the kite lines, especially if you got tangled in between them and the lines are in tension with the kite out of control.
The second is to release the harness directly. This might sound odd, and the only situation that seems applicable is when you can’t use any of the systems before and you are completely out of control. An example could be when you are surfing big wavers and you get caught in the washing machine and you can only feel your harness to get out of kite tension, but it seems more theoretical than realistic. If anyone has a better example, please write it in the comments below.
Said so, it seems worth deepening the bar quick release system functions and on what principle it is based.
Modern kite bar safety system: the principle on how the kite bar quick-release works.
The main concept of safety relative to the kitesurf bar is straightforward: to completely depower the kite you need to foil it (or sheet it out). That means having it positioned like a flag according to the wind direction.
The best way to do that is to lose the tension on all kite lines, but one. In normal conditions when the kite is held only by one line while the others are completely loose, you minimize (almost nullify) the kite’s pull.
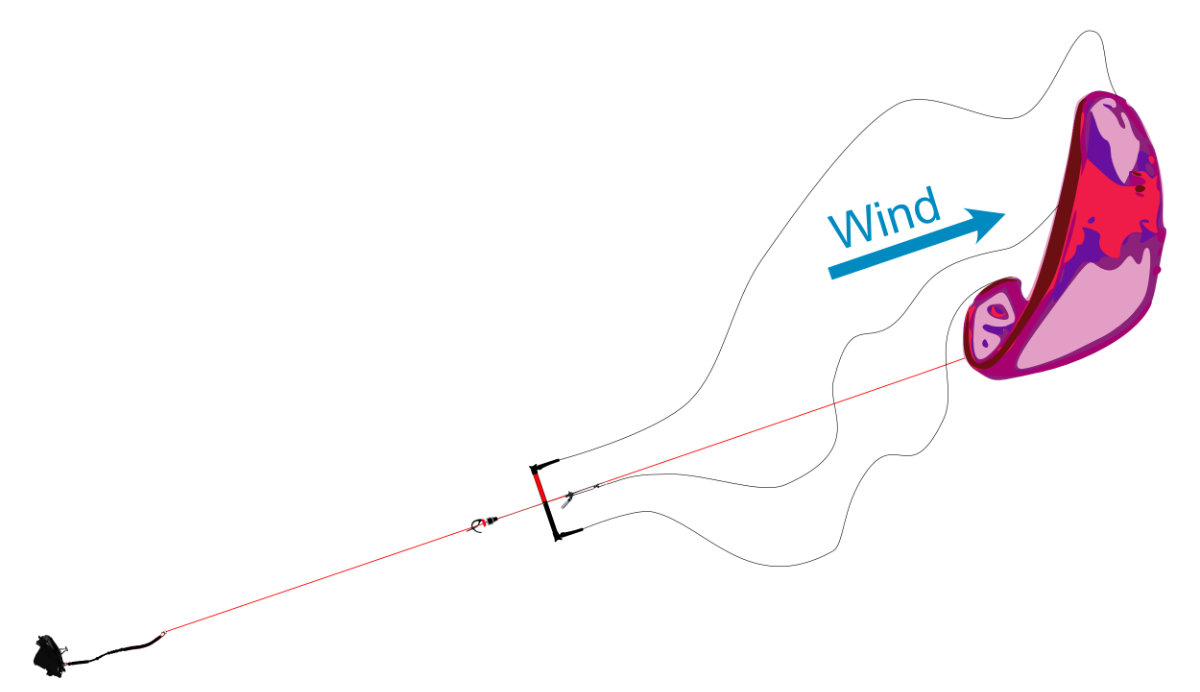
This is the fundamental concept on which the emergency quick-release is based on and, as said, from 2015 all major brands apply it in their design.
Nowadays any kite control bar, both 4 or 5 lines, following this principle has the emergency line connected to only one front line for the 4-lines kites and directly to the fifth line in case of 5-line kites.
The older 4-lines kite bars used to provide the safety leash connection to one front line through a re-ride safety ring that would allow the bar to slide along the line in tension and loosen the remaining. Often this kind of setup came with a stopper ball to prevent the bar to slide too much up to the kite, creating a huge mess on the twisted lines. Nevertheless, the principle of just one line in tension was respected with this solution.
An example of deviation from this concept used to be the Cabrinha IDS (Intelligent Depower System) present on kite bars from 2009 down to 2013. In this setup, the emergency line from the chicken loop was attached rigidly on both the front lines, with no re-ride system on any of them.
This would not follow the principle of one line in tension only, creating the possibility of generating significant power by the kite even after the activation of the emergency system. The concept was developed to avoid big tangling in the lines so the rider could easily restart the kite after the emergency was passed.

This was for sure ok for expert riders, who could have taken further proper actions in case of problems, but promoting it safe for beginners might have been a too big leap. Don’t misunderstand, Cabrinha kites are great and nowadays they are aligned with all the major brands in regards to safety. But that detail in the past could have been checked deeper.
Are kite control bars interchangeable?
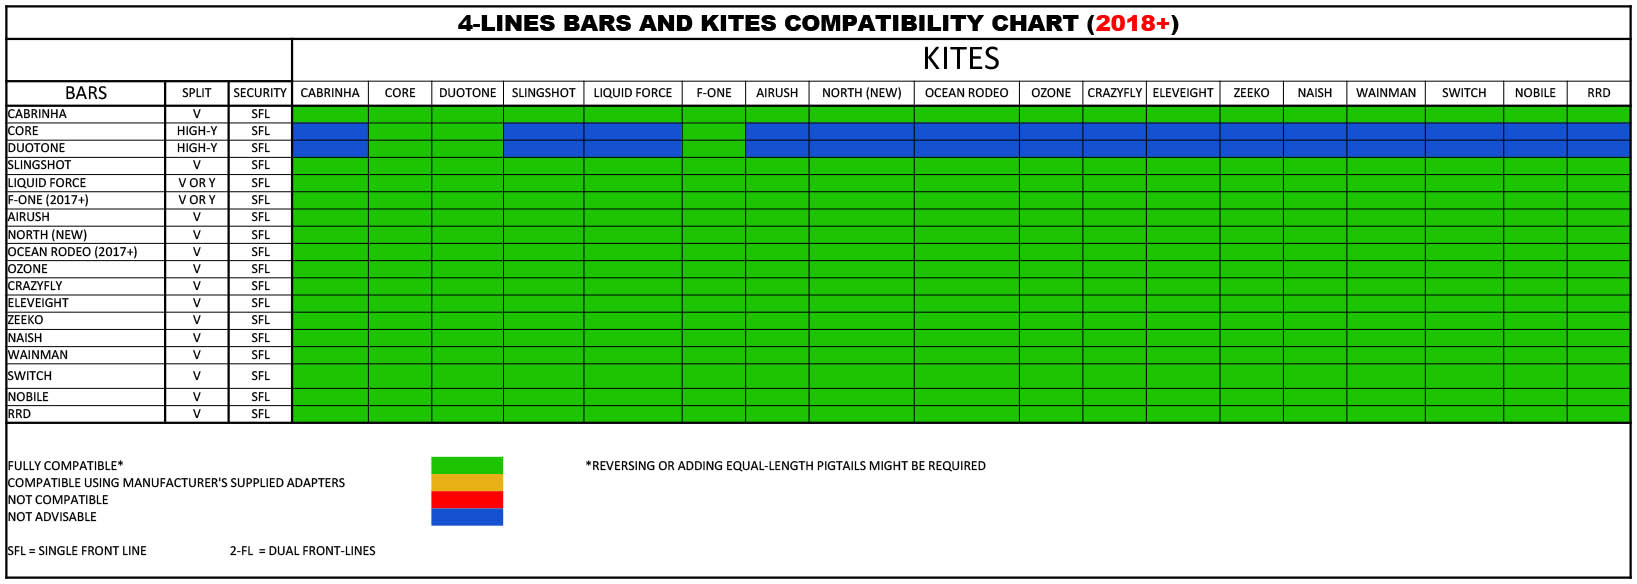
In principle, the answer is yes, with some distinction for specific details. The good news in fact it is that most of the brands out there have reached somewhat of a standard nowadays. For example, Cabrinha, Liquid Force, and Slingshot seem to work pretty well which each other's bar/kites.
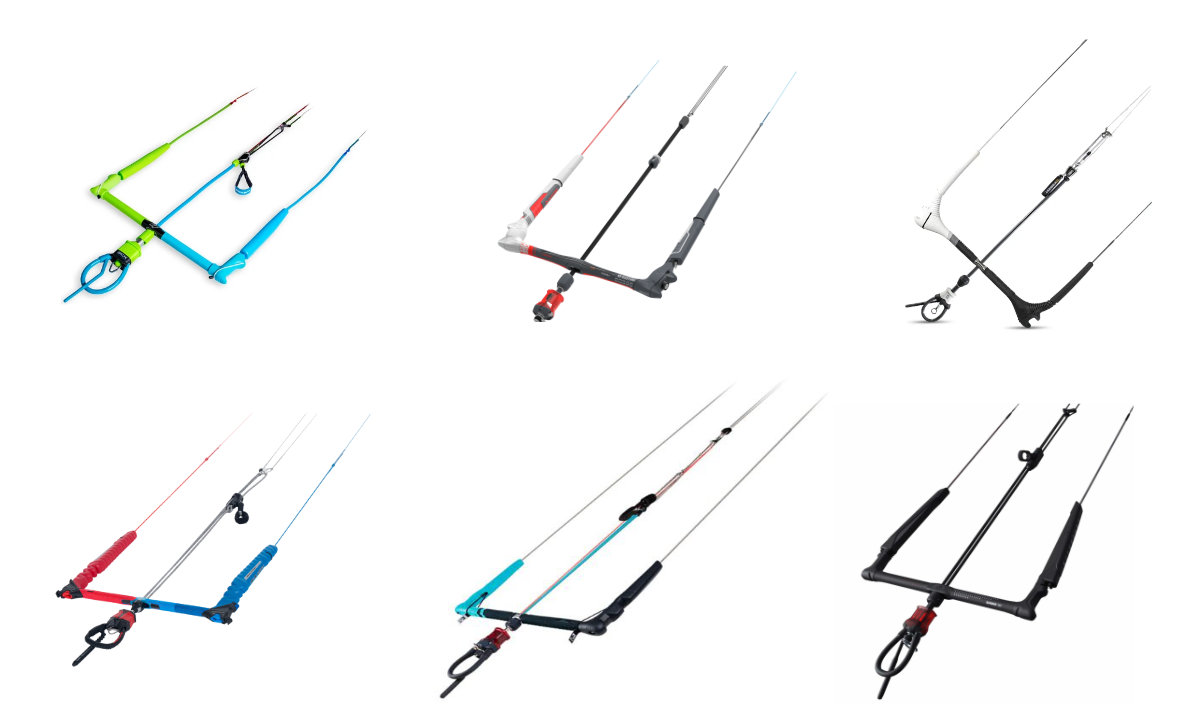
Some kitesurfing brands like Duotone or Core though tend to be more difficult to be interchangeable with other brands on the market.
What you need to look at when thinking to use different bar-kite brands are several elements:
1. The most obvious thing is 4-lines or 5-lines bars and kites: normally that influences the choice range, though several modern kites built to fly with 5 lines can be used with 4 lines. Here the biggest difference consists of the fact if the 5th line has a structural function and it is in tension all the time with the other front lines or if it only serves for safety and relaunch purposes. In the first case, the kite behavior can dramatically change, while in the second the change might have marginal effects.
2. The pigtail connections: some brands have pigtails on the front lines and some on the back lines, to overcome that you need to invert them or make use of universal adapters.
3. The high Y or low Y split: the height where the front lines separate creates a different distribution of forces on the kite and every manufacturer can choose a different configuration. This must be taken in account when flying a kite because its performance can be dependent on that. The rule is flying a kite with a bar that has the correct Y height.
4. The trim: as said most of the brands tend to unify the standard with the easiest trim procedure. Normally to make sure your kite will fly properly you have to check that when the bar is set in a full power position (meaning the depower trim is in its longest configuration and the bar is completely pulled down on the depower line) all the lines, front and back, stretched should have the same length.
This is, of course, a fast rule for the first setup and it might not be good on all kite-bar combinations, so, after setting the kite, a test flight to check the trim is a must.
5. Adjustability: related to the trimming of the kite is the possibility to adjust it: brands might offer different number knots on their lines or kites to fine-tune it. If the kite bar doesn’t have all the adjustments available, some extra adapter might be needed too.

5. Old bars on new kites: that is normally not a good idea (of course depending on how old the bar kite can be). Safety systems especially can turn out to be outdated and incompatible with modern kites. The previous example of the 2009 IDS system of Cabrinha is related to this: it is not a good idea to use those bars even with new kites of the same brand.
Last note: when using a kite control bar with a different brand kite, the response and the feeling might change, you might have a quicker, slower response from the kite, or the bar might feel lighter or the opposite, with more pressure.
An interesting table of bar compatibility was found on kiteforum.com (thanks to Alexeyga for sharing it):
Recently the market has seen the birth of some universal kite bars producers who let you custom the parts of the bar you want to purchase to make it a good fit on your specific kite quiver. Such custom kite bars could be an extra option if you plan to have different brands in your kite collection.
Conclusion
Well, as said it was a long post. The kite control bar is a broad topic and a lot more should be covered: effects of the Y height on the kite behavior, how to properly trim the kite and the kite bar lines, the different connections to the harnesses available today on the market, and so on. So stay tuned for more on this topic and please comment below if you agree and even more if you disagree on what is written here. The best thing is to improve our mutual knowledge with every contribution.

Flowy T-Shirt

Logo: When life gives you wind go kiting!
Promote your Kite School for free!
Index your Kite School in our database.
You will get free lifetime visibility on Kitesurf Culture website.
If you have a website, it will provide precious backlinks to improve your SEO ranking
Relevant Posts
The ability of a kite to drift and when it is important.

Safety Kitesurf Hook Knife, a must to have in your sessions

3 Untold Wind Window Behaviors.
Do you really use the right kite shape for your riding style?
What's a Stall of a Kite and How to Prevent It
Knots on Kite Lines... Watch Out!
Kitesurf Line Length and Kite Behavior: Long or Short Lines?
The easiest way to get injured while kitesurfing? Kiteboard Leash!
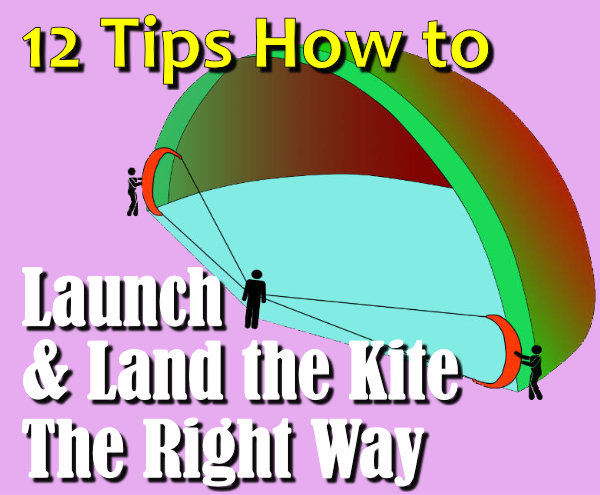
12 Tips to Correctly and Safely Launch and Land Your Kite

8 Simple Tips to Safe Kiteboarding
Get free Kitesurfing Resources and Tips
If you like our content and you want to be informed on the next blogposts release, please subscribe here. That will also help us to continue to provide quality content:
Give us your opinion.
Comments

Richard
Excellent pictorial descriptions of what happens in reality to the lines when you deploy the chicken loop or safety release. Couldn't find this anywhere else.
3 years ago

Geoff
Good overview however you have omitted to discuss the 2 depower options of Above Bar Depower and Below Bar Depower and to give the pros and cons of each. This would serve as a guide to people buying used bars and to fully understand what the options are.
4 years ago
Answers :

Gabriele
Good point Geoff, I will add these details to the post in the next few days and follow up. Thanks for your suggestion.
4 years ago

Rudo Enserink
Hey! Nice summary, I can't resist pointing to the two back line trim systems on the market, from Duotone and Ocean Rodeo (the latter of which is my design), with the obvious benefits of these bars heaving less (no) clutter on the center lines, and more precise and safe control of the trimming operations, and, for me the biggest plus, a super simple and wear and failure proof layout of the center lines. As for interchangeability, I would like to point to Kite Attitude as a supplier of truly universal aftermarket bars, thanks, best regards, Rudo Enserink owner www.enserinkdesign.com
4 years ago
Answers :
Gabriele
Thanks for the Comment Rudo. I have tried the Duotone Click bar. While it can have the advantages you point out, it might also have some downsides. For example, spinning the side handle to repower the kite is way more toilsome than releasing a traditional central trim. I also wonder about the internal mechanism of the bar, can't it get clogged with salt (if you kite on the sea) in the long run? Since you have designed one of these solutions, you might have considered this aspect.
4 years ago
Rudo
Hi Gabriele, Thank you for your question, and sorry for replying late. I can't say much about the Click bar, as it design is quite different from the Ocean Rodeo Shift bar I designed. The Shift bar is designed with easy and effective drainage in mind, we recommend dunking the bar in the water if there's any sand on it - as you would with any bar. I personally never clean or rinse the bar after use and I've seen little to no wear on the internal parts after 3 or so season. As to your point of the location of the winder, I feel our Shift bar has the winder better located at a more natural angle to your hand, than the winder on the Duotone Click. cheers, Rudo www.enserinkdesig.com
4 years ago
Rudo
Hi Gabriele, Thank you for your question, and sorry for replying late. I can't say much about the Click bar, as it design is quite different from the Ocean Rodeo Shift bar I designed. The Shift bar is designed with easy and effective drainage in mind, we recommend dunking the bar in the water if there's any sand on it - as you would with any bar. I personally never clean or rinse the bar after use and I've seen little to no wear on the internal parts after 3 or so season. As to your point of the location of the winder, I feel our Shift bar has the winder better located at a more natural angle to your hand, than the winder on the Duotone Click. cheers, Rudo www.enserinkdesign.com
4 years ago
Travel Mug
Logo: Peace Balance Wind
Promote your Kite School for free!
Index your Kite School in our database.
You will get free lifetime visibility on Kitesurf Culture website.
If you have a website, it will provide precious backlinks to improve your SEO ranking
Relevant Posts
The ability of a kite to drift and when it is important.
Safety Kitesurf Hook Knife, a must to have in your sessions
3 Untold Wind Window Behaviors.
Do you really use the right kite shape for your riding style?
What's a Stall of a Kite and How to Prevent It
Knots on Kite Lines... Watch Out!
Kitesurf Line Length and Kite Behavior: Long or Short Lines?
The easiest way to get injured while kitesurfing? Kiteboard Leash!
12 Tips to Correctly and Safely Launch and Land Your Kite
8 Simple Tips to Safe Kiteboarding
Contrast Coffee Mug
Logo: Kitesurfing making gravity optional since 1977
Latest Posts
Kitesurfing Dubai: an honest guide. Tips, Spots & Winds
Unwind and learn: best beginner kitesurfing spots worldwide
Self-Rescue in Kitesurfing: A Crucial Guide to Safety

Kitesurf Ometepe: an Epic Kite Trip to Nicaragua

Kitesurfing Spring in Andalucia: Unexpectedly Great!